
From smartphones to tablets to desktops, we love our tech gadgets. And no matter how long you’ve used yours, there’s always something new to learn thanks to advancing technology and rolling updates.
Apple’s iPad is among the most popular tablets out there. If you use one, we’re willing to bet there are tricks you’ve never tried, like the split keyboard or Focus mode. Tap or click here for more iPad tips to help you get the most out of the mighty little tablet.
If you’re more of a MacBook or Mac desktop fan, we’ve gathered useful 10 tips and tricks to help you get more done.
1. Command-Space to open Spotlight
Spotlight lets you search for apps, documents, emails, contacts and other items on your Mac. Want to find things even faster? Press Command-Space on your keyboard to instantly open Spotlight. Type in what you’re looking for and a list of relevant searches, folders, maps, images, messages and other files will appear. Use your mouse or arrow keys to find what you’re looking for.
Once you have your results, you have many options including preview, open, copy and show location.
Related: 10 secret keyboard tricks to save you time every single day
2. Notification Center widgets
Widgets let you view reminders, appointments, birthdays, the weather, top headlines, notes and more right from the desktop — available on macOS Big Sur and later.
Scroll to the bottom of the Notification Center and click Edit Widgets then click the add button in the corner of any widget. If the widget is available in different sizes, click the small, medium or large button before adding it.
You can drag widgets around to reorder them and click the remove button to remove a widget if you no longer want to use it.
3. Split view
With Split View, you can have two apps on your Mac screen at the same time without having to manually move or resize windows.
If you’re using macOS Catalina or later:
- Hover your mouse pointer over the full-screen button in the upper-left corner of a window or click and hold the button.
- Choose Tile Window to Left of Screen or Tile Window to Right of Screen.
If you’re using macOS Mojave, High Sierra, Sierra or El Capitan:
- Click and hold the full-screen button in the upper-left corner of a window.
- As you hold it, the window shrinks and you can drag it to the left or right side of the screen.
4. Set up speech recognition
You can control and navigate around your Mac using various vocal commands, which can help you to get more done in less time.
In macOS Catalina or later:
- Open the Apple menu and go to System Preferences > Accessibility.
- Click Voice Control then Enable Voice Control.
- Say “Show commands” or “Show me what I can say” to get a list of commands.
- To pause Voice Control and stop it from listening, say “Go to sleep” or click Sleep. To resume Voice Control, say “Wake up” or click on the Wake up button.
Related: Skip the keyboard: How to dictate in Microsoft Word and Google Docs
5. Set up shortcuts
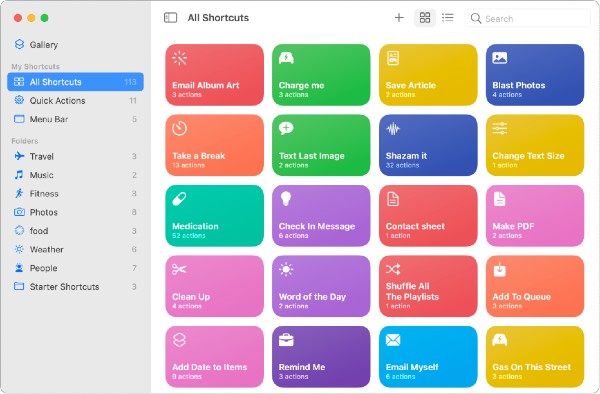
Mac shortcuts help you get things done in less time with just a click. The Shortcuts app lets you add preloaded shortcuts or you can create your own. You can combine multiple steps to create task automations.
To view available shortcuts:
- Open the Shortcuts app and select Gallery.
- Click a shortcut to preview it and the add button to add it to your collection.
- You can run shortcuts from the Shortcuts app, Siri, the macOS Finder, the menu bar, the Actions pop-up menu, the Services menu, the Dock, the Touch Bar, a keyboard shortcut or the command line.
6. Safari tab groups
You can organize tabs into groups to make it easy to switch between groups of related websites when browsing Safari. Let’s say you’re shopping for a new rug. You can group all your options together so you don’t lose one of the links.
There are a couple of ways to create tab groups:
- To create a tab group in the current window, click the down arrow in the toolbar. If the sidebar is open, click Add Tab Group in the toolbar. Choose New Tab Group with [number] Tabs. Enter a name for the tab group and press Return.
- To create a tab group by selecting tabs, click the down arrow in the toolbar. If the sidebar is open, click Add Tab Group in the toolbar. Select New Empty Tab Group, enter a name and press Return.
7. Universal Control
With Universal Control, you can use your Mac to control up to two other nearby Mac or iPad devices. Each device shows its own screen and apps but you can use a single keyboard, mouse or trackpad to move the cursor, type and copy content between them.
Each device has to be signed in with the same Apple ID Universal Control needs to be turned on. Then, follow these steps:
- On your Mac, open the Apple menu and go to System Preferences > Displays.
- Click the Universal Control button then select Allow your cursor and keyboard to move between any nearby Mac or iPad.
- On your iPad, go to Settings > General > AirPlay & Handoff. Turn on Cursor and Keyboard.
Now you can link your devices. Put them next to each other and use your mouse or trackpad to move the cursor past the left or right edge of your screen in the direction of the iPad or other Mac. As you move the cursor past the edge of the screen, the other device shows the cursor pushing through. Push the cursor all the way through to connect the devices.
8. Sign documents in Preview or Mail
You don’t need third-party software to sign documents on your Mac. This is so much easier than printing and signing.
- Open Preview and click the Show Markup Toolbar button.
- Click Create a signature using your trackpad or Create a signature using your computer’s built-in camera and follow the onscreen instructions.
- Now open your document in Preview and click the Sign button then click the signature to add it to your PDF. Drag it to where you want and use the handles to adjust the size.
You can also add your signature to emails:
- Open Mail and go to Mail > Preferences > Signatures.
- Select the email account where you want to use the signature.
- Click the Add button below the middle column.
- In the middle column, type a name for the signature.
- Create your signature in the right column.
- To add an image, drag it into the preview area.
- When you compose a message, the option to choose your new Mac email signature will appear beside the sender information bar.
9. Bulk rename files
You can rename several files at once in macOS using Finder, saving you time and effort. Here’s how:
- Open a Finder window and select the files you want to rename by dragging the cursor to select them within a box or shift-clicking or Command-clicking the files or going to the Menu and selecting Edit > Select All.
- Right-click the selected files and select Rename or go to the menu and select File > Rename.
How to batch-rename multiple files in Finder in macOS
- Within a Finder window, select the files you want to rename. You can drag the cursor to select multiple with a box, or shift-click or Command-click the files, or in the Menu, select Edit then Select All.
- With the files selected, either right-click the selected files and select Rename, or go to File then Rename in the Menu.
- Use the dialog box to rename your files.
- Once complete, click Rename.
10. Create a custom keyboard shortcut
There are a ton of useful Mac keyboard shortcuts — some of which you may already be using. Tap or click here for some of our favorite and most-used options.
You can also create custom keyboard shortcuts for menu commands in any macOS app:
- Go to the Apple menu then System Preferences > Keyboard > Shortcuts.
- Select App Shortcuts then click the Add button.
- Click the Application pop-up menu, then choose a specific app or All Applications.
- If an app isn’t in the list, choose Other, then locate the app using the Open dialog.
- Click inside the Keyboard Shortcut field and press the key combination that you want to use as the keyboard shortcut then click Add.
You may also like: 5 hidden Google Assistant tricks for your Android